A lifetime of a laptop is not very long. An average lifetime of a laptop is 4 to 5 years if maintained properly. If you have an old laptop which does not run as fast as you would like to, you can repurpose your laptop and use it. Or pass on the laptop to your brother who is a school student.
Windows is a heavy operating system which needs a lot more resources to run. The software gets heavier along with the OS which makes the older laptops run slower after a few years.
To make your laptop run smoother again, you would need a much lighter OS. An OS like ChromeOS Flex.
The best way to repurpose your old windows laptop is to remove the Windows and install it with Chrome Flex OS to turn it into Chromebook.
This will save you money and have an extra “good” laptop to use or pass it on to a younger family member.
How to turn an old laptop into a Chromebook
The best part of this OS is that the requirements to run it are very less and are extremely light not requiring much hardware resources.
The minimum requirements for installing ChromeOS Flex are
- Architecture: Intel or AMD x86-64-bit compatible device
- RAM: 4 GB
- Internal storage: 16 GB
- Bootable from a USB drive
- BIOS: Full administrator access. You’ll need to boot from the Chrome OS Flex USB installer and make some adjustments in the BIOS if you run into issues.
Any of your old laptops will definitely have this minimum specification. To install the ChromeOS Flex, follow the steps given below.
REMINDER: Before you begin installing ChromeOS Flex, make a backup of any files on your current operating system! The procedure is identical to a clean installation of Windows, Linux, or macOS and will totally wipe your disc.
Step 1: Create the USB installer
Download and install the Chromebook Recovery Utility.
- Open the Chrome browser on your Chrome OS, Windows, or Mac device.
- Navigate to the Chrome online store.
- Click Add to Chrome in the upper right corner.
- Click Add extension when requested.
- The Chromebook Recovery Utility is now available as a Chrome browser plugin.
Enable the Chrome Recovery Utility addon.
- Click Extensions and then Manage extensions at the upper right of your Chrome browser window.
- Toggle the switch to the right next to Chromebook Recovery Utility.
- Optionally, click Details and move the switch to the right.
- After you enable the Chromebook Recovery Extension, click on the extension in your browser’s extension panel to open the pop-up.
Create the USB installer.
- Launch the Chrome Recovery Utility extension in your Chrome browser.
- Click the Get Started button.
- Click Choose a model from a list.
- Find and select Google Chrome OS Flex under Select a manufacturer.
- Find and select Chrome OS Flex under Select a product.
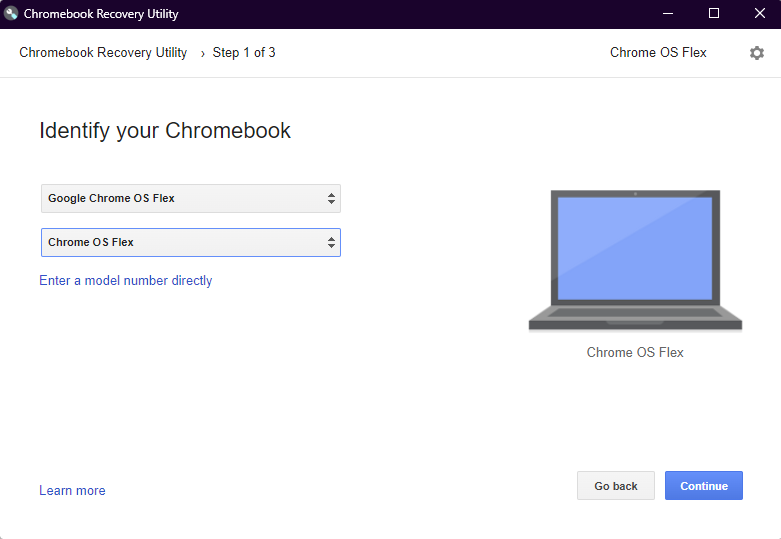
- Click the Continue button.
- Insert your USB drive when requested.
- Select the USB drive from the dropdown option.
- Click the Continue button.
- Now click Create.
Remove your USB drive from the device after you receive a notification that your recovery media is available.
Step 2: Boot the device using the USB installer
Boot the device you want to run Chrome OS Flex on with the USB installer you just built. Check Google’s official Certified model list. You can install ChromeOS Flex on any laptop but certified devices will be more stable and non-certified devices might face some issues.
- Turn off the device that will run Chrome OS Flex. Make certain that the target device is entirely turned off and not sleeping or inactive.
- Insert the USB drive into your laptop and turn on your laptop.
- Begin hitting your device’s boot key repeatedly right away. Entering into the BIOS menu can differ based on the laptop and you can find the keys to enter into the BIOS menu on the internet.
- Choose your USB installer as the boot device. To pick your USB installer, use the arrow keys or, in certain situations, the mouse.
In the BIOS or UEFI configuration menu, look for Boot or Startup options. Then, as instructed on the screen, designate your USB installer as the first, primary, or preferred boot device.

After successfully booting Chrome OS Flex from the USB installer, you can permanently install it, deleting the device’s present operating system and replacing it with Chrome OS Flex.
If you are not yet ready to install Chrome OS Flex on your laptop, you can use the USB installer to run it temporarily. You may then test and validate that device functionality, such as networking and input tools and then take install the OS if everything works fine.
Explore the ChromeOS Flex
On the device from which you booted the USB installer:
- Click Get started on the Welcome to Chrome OS Flex screen.
- Click Try it first on the Start with Chrome OS Flex screen.
- Follow the directions on the screen.
- Log in to your device.
Permanently install ChromeOS Flex
To permanently install Chrome OS Flex when you’ve finished testing or exploring it:
- Log off the device.
- Click the time at the bottom right.
- Click the Sign out button.
- Click Install Chrome OS Flex at the bottom of the sign-in screen.
- Examine the on-screen warning about deleting data carefully.
- Click the Install Chrome OS Flex button.
- When the installation is finished, a notice will appear on the screen. The gadget immediately shuts down.
- Take remove the USB installer when the device is totally shut off.
Conclusion
Voila! Your old laptop is much faster and actually usable now. While ChromeOS Flex is extremely handy in these situations, there are chances that your device will not be compatible at all. But, such chances are rare and most probably your device will run fine without any problems.
It should be noted that you will be installing a completely different OS on your laptop which is very different from WIndows. Many keys on your laptop keyboard may function differently because there is a new OS.
ChromeOS can work really well for students and using it for simple, daily tasks like browsing and checking your email. You essentially get the desktop version of Android which gives you access to certain Android applications.
If you are looking to buy a new laptop, check out this ultimate laptop buying guide. Or find the best laptops under ₹40000.
Leave a Reply
You must be logged in to post a comment.